|
|
|
DivX ;-) MIND
| Home
| DivX? | Software
| Guides
| Ender? | Links |
Audio
Synch Problems
Sometimes, for one reason or another, our video is out of synch with our
audio, or vice versa. This usually only happens at two times; when we are
multiplexing, or when we join two videos together. Luckily, there are wonderful
easy to use tools to fix these problems.
Now before you can fix something, you must understand how and why it is
broken. In the case of Audio Synchronization, there are two possible problems :
the audio is stretched or displaced. The picture below
demonstrates this rather well.

When the synch is perfect both the audio and video will match, like the
first image shows. Video frame 1 matches Audio frame 1 as does 2,3,4 and so on.
The second picture shows when the audio is displaced. This means that
both the audio and video are correct lengths, but they are just misaligned,
making the audio and video start at different times causing displacement. In the
third picture, the audio and video are different lengths, because one of them
has become stretched somehow.
Before we can fix this, you must take a really good look at your film to
determine which problem you have. If the audio is equally out of whack at the
beginning of the movie as it is at the end, then you have an Audio
Displacement problem. If the audio is good at the beginning, but really
sucks at the end ( or the other way around ) you more than likely have a Stretched
Video/Audio problem.
Fixing Audio Displacement
I decided to begin with Audio Displacement because you are
more likely to come across this than Stretched Audio/Video. And
because this is a little easier to repair ;-) To fix this, you must open your
video in VirtualDub. Go to AUDIO>INTERLEAVING.
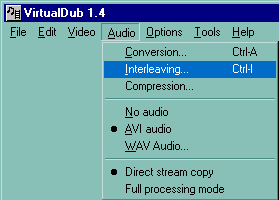
Leave everything the same except the DELAY AUDIO TRACK part.

Now look at your movie. Figure out if the sound comes out before
or after someone speaks. If the sound comes out before
they talk we will use positive numbers to slide the audio forward. If you hear
sound after their mouths move, then we will use negative numbers
to slide the audio backwards. 1000 = 1 SECOND, 500 =
½ SECOND, 250 = ¼ SECOND.
Lets say that the sound appears just after the person speaks. To solve this we
must slide the audio to the left a bit. So we can put in minus 250 (i.e..-250) .
Press OK and play the movie in VirtualDub. Is it correct? If not,
does the sound come before the person speaks or after? Lets say it is much
closer but still comes after the persons mouth moves, we could try increasing
the delay b putting in –300. Press OK and check the movie again. Keep
doing this until the audio is in the perfect place.
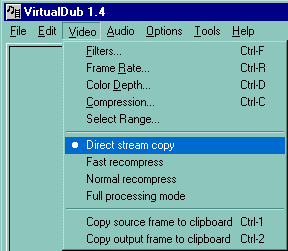
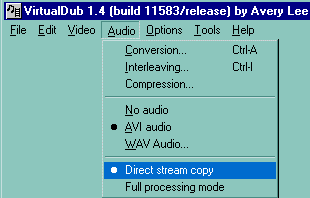
When the audio is correct save the movie by choosing:
VIDEO>DIRECT STREAM COPY
AUDIO>DIRECT
STREAM COPY
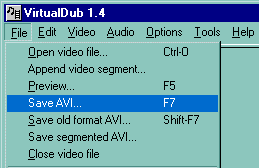
FILE>SAVE AVI
Fixing
Stretched Audio
I saved this one for last, because it is a little bit more detailed.
Before we start, you should download AVInfo. It is available on my
software page. Now before you start, I would like to recommend that you save a
backup copy of your original AVI in case something goes wrong.
After you install AVInfo, you don’t run it like conventional
applications. Just find the AVI that you want to synch, and right-click it. You
will see an option that says AVI INFORMATION. Click that.

You will see the following
window :
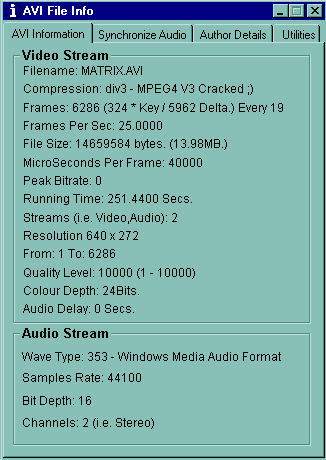
This window tells us all of the cool little things that you usually
won’t know about your movie. Click on the SYNCHRONIZE AUDIO tab. We
will see a preview of the video that we want to fix. The only difference is a
special control panel that tells us what frame the video is on.

Find a place in the movie where the audio is bad, and you can see their mouths. Once again, pay attention as to whether the sound comes out before or after the mouth moves.
1. If the audio comes after they speak we must decrease the frame rate.
2.
If the audio comes before they speak we must increase
the frame rate.
This might sound a little weird so let me break it down: to make the video longer, we decrease the frame rate. To make the video shorter we increase the frame rate.
Synching is fairly straight forward. Play your movie, if the audio comes after the mouth moves, click the –0.001 button (4) once, click APPLY, and try the movie again. If it is not correct, repeat the process until it is ALMOST perfect. Then use the fine tuning arrows (2) to get the final perfect audio. If the audio comes before the mouth moves, we must use the +0.001 button the same way as above.
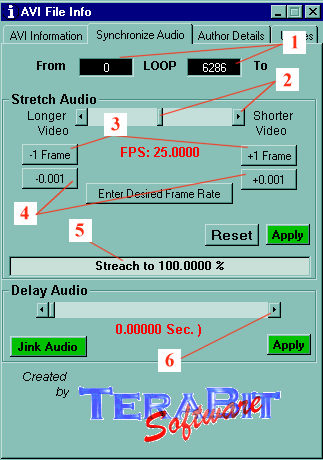
When you get it perfect, simply hit the X button in the corner to exit. Choose to save the AVI, and you now have a perfectly synched movie.