|
|
|
DivX ;-) MIND
| Home
| DivX? | Software
| Guides
| Ender? | Links |
Merging
the Audio and the Video
Now that we have our movie encoded to DivX ;-) and we have our audio
ripped and normalized, it is time to merge the two. The technical term for this
procedure is “Multiplexing”. In order to do this, we need to have VirtualDub
1.4 installed on our machine. It is available on my software
page if you don’t have it yet. You will see that using VirtualDub is
quite easy once you get the hang of it. And it is especially easy to multiplex
video with this utility.
Once you have VirtualDub loaded, go to FILE>OPEN.

Find the file that you would like to work with and CLICK OK. Now
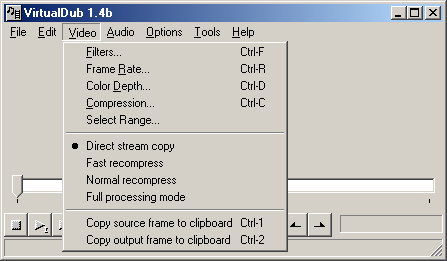
go to VIDEO>DIRECT STREAM COPY.

This ensures that we will not affect the video itself. If you have done
this correctly, you should now see a black dot next to DIRECT STREAM COPY
like in the picture above. The next step is to choose AUDIO>FULL
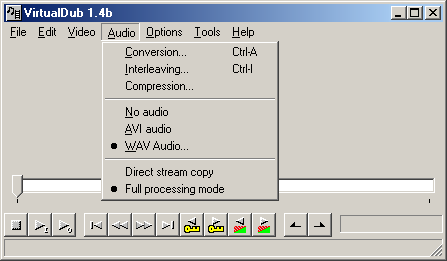
PROCESSING MODE.

Once again, you will see a black dot appear next to FULL PROCESSING
MODE. What we need to do now is select the source of our audio, go to AUDIO>WAV
AUDIO.

When we do this, VirtualDub will ask us to find the wave file that
we created with Ac3Dec and CLICK OPEN.

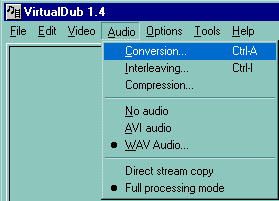
Now we need to decide how to convert our audio, so go to AUDIO>CONVERSION.

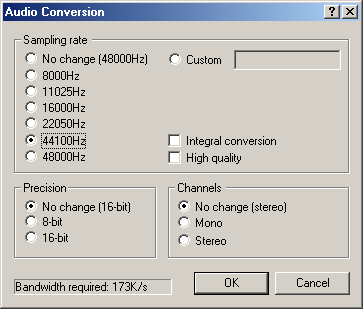
We need to change the sampling rate, so select 44100Hz, and make
sure that the HIGH QUALITY box is checked and CLICK OK.

Because the whole purpose of DiVX ;-) is to make our movies smaller while
maintaining quality, we must compress the audio as well as the video. To do this
we are going to call upon a standard that I am sure you have heard of, Mp3 ( if
you haven't, it stands for MPEG Layer 3). Go to AUDIO>COMPRESSION.
Scroll down and choose MPEG LAYER-3. Click the SHOW ALL FORMATS
box. Now you must make a choice. You can choose 96kBit/s 44100Hz, Stereo; or you
can choose 128kBit/s 44100Hz, Stereo for slightly better audio. Keep in mind
that choosing a higher bit rate increases the overall size of our movie. ( I use
96, and I can’t really tell the difference.) When you finally decide, CLICK
OK.
Don’t worry, you are almost there. The only thing that we have left to
do is save our new AVI. Go to FILE>SAVE AVI.

Choose the location and the name that you want, and CLICK SAVE. If
after you do that, you get an error message, it is most likely because you
forgot to change either VIDEO>DIRECT STREAM COPY, or AUDIO>FULL
PROCESSING MODE. If you happen to get a warning saying something about a
hacked Codec, don’t worry about it and click ok. You will now see this screen.

This is the progress window. You can do a number of things here if you want to. Such as : uncheck Show Input/Output Video, or change the Processing Thread Priority. Doing either of these will increase the amount of CPU power that you use, thus increasing your conversion speed. That’s it, depending on how long your movie is, you will have perfect audio with it in roughly 1 ½ - 2 hours.
Normalizing Audio <--- Guides Home ---> Fixing Audio Synchronization